
Evaluation of My Interactive Audio Cat
My intentions at the beginning were very simple to how they are now. I started of with minimal knowledge on processing.org which grew slowly over time and a clear idea of what audience the sketch would have been shown to. With the presentation being in the media building foyer the would be people from the age 18 to 22 as the main audiences as well as the teachers. The main aim for any media form to work is it needs to get the peoples attention. Later on, after going through London, visiting the different museums I would unintentionally overlook how the adults and the children were understanding the different exhibitions and it gave me an idea. This inspired my theory of audience perception. I wanted to use my media to prove other people perception is different to anothers depending on their life experiences.
I slowly grew more knowledge in processing before setting goals to achieve. The list of intentions created were to:
- Create a piece to catch the audiences eye
- Learn about processing on a good level
- Try something new like the minim library on processing
- Get the audience to try and interact and understand my work
After trying out different examples of processing on different difficulty levels I went on to finding out how I wanted mine to look and behave. I chose sound because it was new ground I hadn’t already covered. This was to motivate me to spread my knowledge and understand more about processing’s options and the bounds of your creativity. With my idea being an image of some sort exploding I didn’t think I would be capable but after going through multiple examples and various forums I was able to see it was possible. My work started off very basic as I only covered the code I knew then but slowly over time the image developed. From the start I knew I wanted to work with minim or audio because it was different and I wanted to explore new grounds that I hadn’t yet focused upon. This had many ups and just as many downs but the outcome was better than I thought I could have done at the beginning of this assignment. I created a piece that was almost identical to what I had imagined.
Working with different code, research, multiple forums and photoshop I feel I have completed each one of these to the best of my ability. However I know there is room for improvement as their would seeing as this programme as well as being presented in a media space. The main issue developed during the presenting, I noticed to get the attention of the audience was a lot more difficult than expected. With the majority of audience members rushing by it was not easy to see how they reacted towards my work or if they understood what it was and what is was doing. To gain more attention I could have used OpenCV and use the camera function so the background of the image was a live view from the camera. This would not have gained everyones attention but it could of drawn peoples attention towards the cat image breaking apart. Another point I did not factor was the environment. It was not a place for everyone to stand about the main area for people to rush around, either leaving or entering. If the environment was closed and forced you to stop and look like the museums I was inspired from this would have given my greater results towards my theory.
Furthermore, even though I chose a more welcoming image of a cat I feel that maybe I should have chosen a more outrageous image. You could argue that we are all use to the comforts and what gets our attention most are the touchy subjects like the lady who got breast implants off of the NHS or when ebola was spreading around Africa and threatening to hit the UK. However, I did not want to cause upset but I feel this would have given me a lot more attention and emotion from the audience.
I could increase the chance of people gaining opinions of my work by a different use of image which clearly has two sides towards it, this could be covering a subject a big headline in the news. In addition to this I would also change the space to where the processing file would be shown in a more private showing. This could be an intimate area where people have been informed or invited to see the interaction work for them so they know they will have to understand the media, show how they feel about it, and what they say it is trying to express to them. Lastly, I would control more of the environment and the image to see how far I could push people to get themselves to believe what they see is true, and once everyone is quiet prove them to be wrong.
Overall I feel very positive on how the sketch came out very close to the original idea and the vast amount of skills I have gained from this project with many more to come. Not to mention that I will be moving further into understanding how to gain success in integrating an interactive(or not) media into the environment around to make sure I avoid this issue again.
Interactive Audio Cat
Interactive Audio Cat from Hayley Vice on Vimeo.
Here you can see my video showing some peoples reactions towards my interactive piece, the areas I showed my media and the piece itself. Overall, from the two days I was able to get a lot of good feedback towards my sketch. I was able to get many types of feedback with students and adults both asking me about how it work or what its meant to mean, spontaneous comments and odd reactions.
There were some points that showed me aspects of how my work could be improved. From monitoring other people watching the live camera feeds the audience were immediately drawn and were redirected to my sketch which lead to the majority of the reaction I recorded. It made me think would I need the background to be a live camera feed so I immediately get the attention of the audience.
With all the information learnt from this I feel there is a lot of knowledge i can’t take forward and into account for future interaction pieces and other medias.
Testing: 2
Today I tried a different area of the foyer which was the entrance, I gt a lot of peoples attention. Some of that was strange looks and others were strange interations.
With the majority of people coming in from the entrance I did get a good amount of people looking at my work. I received comments on what people saw. A woman walked passed slowly with a friend and shouted out “oh! Its a Cat”. This gave me a good indication the woman didn’t see it as a cat until she payed attention towards it.
One interaction I was able to capture was a group of men walking past the screen seeing the interactive piece and started yelling and waving there arms and letting them break up the image and see it go back together.
Overall, today was much better as I got a lot more interaction with my work compared to yesterday and I will attach a video showing some of the footage captured of my work and some peoples reactions.
Testing:1
During the presenting of my interactive piece ip the area was much louder than I expected after the
From the appearances today I noticed most of the people were moving in groups like herds of animals only going in one direction at one time and another ten minutes after. however the amount of people coming in the direction of my piece was not as many whom were com from the other direction. I chose to be in the centre of the foyer at the start which was clearly in site to the people leaving the building from the main exit so I didn’t expect many people to miss seeing my Interactive Audio Cat.
While I was around the sketch I noticed a small group of people notice the cat image and point towards it showing they clearly were drawn towards the image however they did not stay around but walked straight pass. However they were not the only people who noticed as a couple of people noticed the more noise or less. Which was very positive and made me feel like people wanted to work with my piece and pay attention to what they can see.
Towards the sensitivity of the cat at the beginning I chose to heighten the sensitivity in the clean up sketch so the people could be herd but this wasn’t an issue but with the larger crowd not being able to see a clear perspective some people didn’t understand unless they stopped and quietened to look.
But from previous research it showed a different perspective as the rush in the morning is different to one in the evening.
This has lead me to go again tomorrow to test my video gain at a different time in the day to see the difference. I may even change which screen I shall use to see if the audience will act differently if they are in a different area of the foyer.
Iteration 6: Sketch Clean Up
I changed a few things on my sketch to clean up my sketch. Firstly I changed the size of the canvas to “displayWidth” and “displayHeight” so the image would always fill the screen rather than resizing each time. This saves time and shows I am prepared if the TV screens are all in use and the longer screen is left. ![]() Secondly, I created another float called for the audio and used the map function to set the out values for the audio input. Then placed s in the original position of “in.mix.get(i)” and increased the sensitivity to 40000 so sound will be heard from the people’s feet as well as their voices.
Secondly, I created another float called for the audio and used the map function to set the out values for the audio input. Then placed s in the original position of “in.mix.get(i)” and increased the sensitivity to 40000 so sound will be heard from the people’s feet as well as their voices.![]() These were the only chafes I have made towards my sketch as I could not see how I could have decluttered the sketch anymore. With all the alteration the sketch still works and seems to react quicker to sound than before. Hopefully this will show in the presentation of my interactive piece the next week or so.
These were the only chafes I have made towards my sketch as I could not see how I could have decluttered the sketch anymore. With all the alteration the sketch still works and seems to react quicker to sound than before. Hopefully this will show in the presentation of my interactive piece the next week or so.
Iteration 5: The Final Image
Here are the selection of animal I chose. each of the drawing I have drawn, each with only four colours to avoid complicating the image and losing more of the image as only black and white moves a little while the colour in the images explodes out.

Each of the sketches were done myself through photoshop so I had control over how I wanted each animal to look. All of the animals were aimed to be in the same style with minimal range of colours and clear details so the animal was obvious when the image was still.
The Dog

To being with I started using the dog as the image used so far was of a cat. Below is a larger image of the dog. I chose a dog as it is a comforting domestic animal that everyone knows about rather than it being a specific celebrity or a certain type of frog. The image is very recognisable to be a dog . However the quality of the dogs image was not up to standard and with the colours used the pixels pulled the whole image apart rather than just the brown patches behind its eyes and the sketch marks. I don’t feel this dog is the correct animal so far through this experiment. Here are the images below of the dog without live sound and another with sound.

Without Sound

With Sound
The Bunny

I chose the bunny as my next animal of choice because I find them adorable as well as most of my female friends whom I asked. I chose lighter colours than the dogs to see if this would make any difference to the sketch once dispersed. Once I attached the image of the bunny I felt the image looked much better than previously with the dog image. The colours that weren’t white broke away and exploded outwards like specific puzzle pieces taken out of the puzzle. This image was very strong and I very possible to be the final image to be used. Below you can see how the image reacted with and without audio read. As you can see the image has reacted a lot better to the sound and has given the desired effect.

Without Sound

With Sound
The Cat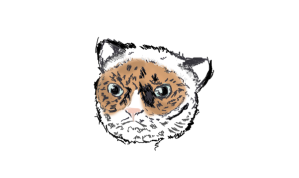
There were multiple choices of animals I wanted to try like a giraffe but I thought using a familiar and warming animal would be the better option, so I updated the cat image. When the image was broken into particles the image didn’t look like a cat to me but instead a racoon as all the colour has gone as well as the cat defining features. Unlike the bunny and the dog, the feline image is almost unrecognisable when the live audio is loud enough which is the main goal for the final image to have. As you can see below the image has changed clearly.

Without Sound

With Sound
Overall, cat seems to be the best animal in my eyes as the cat is a very recognisable figure and when the image is dispersed into particles it starts to form other animals for example, I though it was more like a panda than a cat. Therefore I shall be using this image to the finished sketch and hopefully will look similar to the picture shown so others see my piece and have the opportunity to see whatever image they want and decide there own meaning for it.
Iteration 4: Image Ideas
Creating an image where the image can change into two different objects. through the current process I have used a picture of a cat during the process of making my interactive piece and over the time it has lead me decide on what image I want. This could be sticking to something we all see or something a little different to grab the attention of the people.
My first idea on the image was for it to be something a little bit shocking like an image of an infamous celebrity. This would be to get the attention of the audience at a faster pace but I’m not sure if this is the right way to go around it as it might cause upset rather than getting the people understand the art how it is meant to be seen.
My second idea is to use an animal or animals which people understand and to attract the attention because it is more pleasing rather than upsetting. I have decided to look into the range of domestic animals,i.e. dogs, cats, rabbits, etc. This way I can see which one would work best.
I feel the second idea could be a better way to go to avoid turning my interactive displays idea it into something unintended. Furthermore, I will explore each of the possible animals to see which one I feel would work best for the final draft and add the final animal to the interactive piece immediately.
Iteration 3: The Audio and The Image
I already added imported in minim and spoke about the audio in my sketch during the first iteration.
Instead of z being equal to zero I added the live audio and times it by 40000 to make the sketch sensitive to the live audio and then I times the brightness of the image pixels then plus 400 onto the finished equation. This section of code decides how far the pixels go, which direction and even change the colour of the pixels.
![]() After this I changed the positioning of the rectangle so it was more towards the centre for the moment before I change the image around for the final interactive piece.
After this I changed the positioning of the rectangle so it was more towards the centre for the moment before I change the image around for the final interactive piece. 
And lastly I came over an issue while adding the audio and found that whenever I played the file a high pitched noise would come out of nowhere, this stumped me for ages and found there one line of code which allowed to the sound from the sketch to be played while the sketch runs. I removed this line of text below to avoid this issue on the day of presenting my work.

So far this is how my sketch is working so far rather than a still image with a currently pointless audio monitor. As you can see the image is quite jumpy but I intend to clear the code to make the piece run a lot smoother so the audience can understand its their voices and walking tat causes the image to break rather than it looking random.

Iteration 2: Pixels and co-ordinates
Now I’ve set up all of the basics I have ried to find out how to break my images up into pixels. After viewing example from other people on the processing forum and the examples given by Processing itself I have found out that I can section my image into columns and rosin order to make the images like small pixels.
I introduced the cell size being equal to 2 and columns and rows. as you can see below.

Moving down the sketch next went I also added the code “P3D” to the size of the canvas to make sure it gives a 3D effect. This is so when it looks like the image is breaking apart it looks like there is distance from the image left behind and the pixels dispersed.

I also added further code in the draw section of the sketch which included pointing out the x and y position of the pixel array and grabbing the colour of each pixel. Furthermore,I used float on z to make the z axis was zero while i work out further how to add the audio input and break apart the image. Lastly, I used pushMatrix() and popMatrix() as without them the image doesn’t works and the specific pixels don’t know where to go.

My next step is to get the sketch to monitor the live audio after I have added a feed in and try to make the image move about rather than the still image and decide on the type of image I want to use towards my final piece and attract the attention I need for my work to be taken notice of.
